| CHAPTER | 13 |
| ClientBase | |

|
|
13.1 Running ClientBase
mouse: double click with the mouse
keyboard: use the arrow keys to highlight the icon, then press ENTER
13.2 The ClientBase screen
The screen is divided into two. The top half is the client view.
The bottom half is the client list.
13.3 Moving around
13.3.1 Moving through the records
Click on the client list and use the arrow keys on the keyboard to go through the records.
13.3.2 Editing a client record
To change a record, just edit the fields you wish to change, then select Update database from the Edit menu.
13.3.3 Adding a new client record
To add new blank records use New Client from the Edit menu.
13.3.4 Deleting a client record
Select the client view and choose Delete client from the Edit menu.
13.3.5 Sorting clients
Choose By Business from the Sort menu to sort clients into alphabetical order based on the business name.
Choose By Code from the Sort menu to sort clients into alphabetical order based on the client code.
13.4 Linking to ProTax
13.4.1 Tax
To run ProTax from ClientBase select a client, using the client list on the bottom half of the screen. Check that the client's type of business is correctly set, as this will affect the tax return you will generate. You will find this by clicking on the business button.
Then select Tax from the Tools menu. This will bring up the selected client's tax return.
To run ProTax for Pay and File, select Corp Tax from the Tools menu in a similar manner.
To return to ClientBase, exit from ProTax in the normal way.
13.4.2 Client codes
There are two methodologies available for the nameing of tax return files.
The default is based on the client name. The latter can be selected by going into a tax return and choosing Tools / User Setup / advanced / use client code. This will set up the software to save all returns under the client code rather than the name. Changing naming convention will have consequences if you have already saved many returns under the alternative naming scheme. It is also possible to select to use the client code based naming convention just on specific clients. To do this, select the client in the client database and then choose tools / advanced / use client code for this client. Finally if you have recently changed naming convention and you have brought up a tax return and it is blank because the data is stored under the other naming convention, in the tax software, tools / advanced / open alternate.
13.5 Exiting from ClientBase
To exit from ClientBase, choose Exit from the File menu or press down the Alt and F keys together, then press x.
13.6 Printing
13.6.1 Printing the Client List
Click on the client list and select Print from the File menu.
13.6.2 Producing labels
To produce sticky labels for a mailshot, first select the clients, by status or group as outlined in the previous paragraph. Then choose Labels from the Tools menu.
Choose the style of labels you will be using from the list displayed when you choose Open from the Layout menu. ClientBase currently is setup for Avery 7163 laserprinter labels. Choose Print from the File menu.
13.7 Filtering
13.7.1 Selecting clients
There are two primary ways of selecting clients by status and by group. A client has a particular status at any one time and can belong to a number of groups.
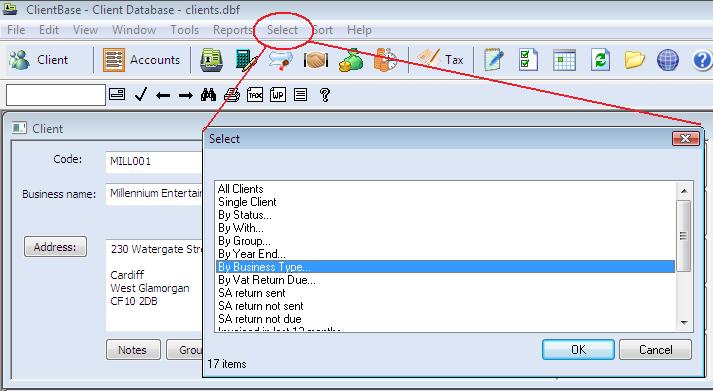
You set the status of a client using the status field. There are a number of predefined choices. These are set up by pressing the Status button after selecting User setup from the Tools menu. To display only the clients with a particular status use By Status from the Select menu.
In addition to having a status, a client can belong to a number of groups. You could have groups such as agriculture, high turnover, xmas card list. To create a new group press the groups button, enter the name of the group and press the new group button. Once you have your group names decided on you can select which groups each client is in. Choose the client in the client list, then press the groups button. Click on each group the client is in. To display only the clients in a particular group use By Group from the Select menu.
|
Using the select menu you may select a subset of clients in the bottom half of the screen. This active subset will be used for example when you create sticky labels.
13.7.2 Displaying all clients
To display all the clients again, regardless of status or group, choose All from the Select menu.
13.7.3 Inactive clients
13.8 Deadline management
|
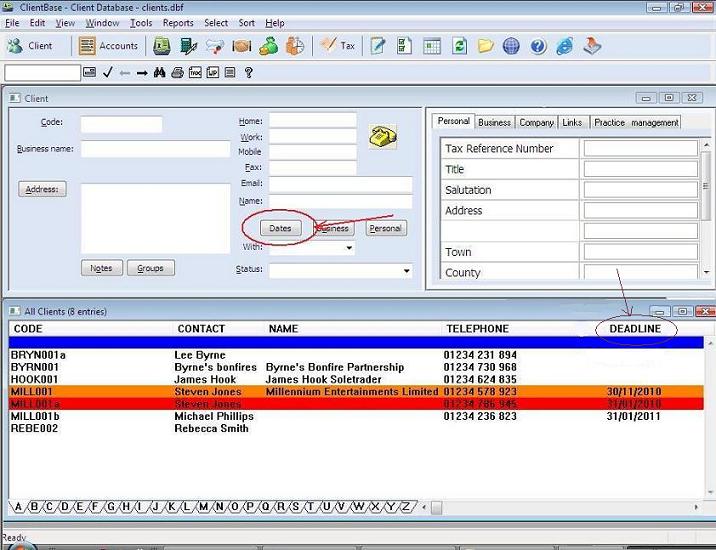
The deadline dates completed using the date button colour code clients in the clientlist. An deadline overdue or due within 7 days is shown in red. Those within 30 days in orange.
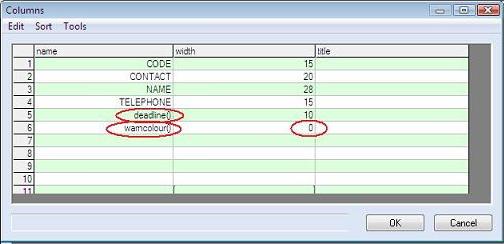
You can customise this colouring and add further ones using tools / advanced / customise / warning colours.
|
13.9 Client folders

|
Each client has a client folder. For example if the client code is ZZZ and the clients folder is c:\forbes\clients the the client folder will be c:\forbes\clients\ZZZ. All files related to this client accounts, company secretarial, standard letters etc will be stored in this folder. Using the client folder icon on the toolbar will open the client folder for a particular client.
You can change the location of the root folder for client folders using tools / user setup / paths
13.10 Data Import and Export
file / export / google/icloud will update the contacts on your iphone/ipad/android device via icloud or google contacts. You do this for all clients or just a subset e.g. those clients allocated to a particular partner.
The calendar/year planner in client base can import from the your icloud calendar using File / Sync
13.11 Notes and Standard letters
13.11.1 Introduction

|
Notes and standard letters includes 3 commands:-
13.11.2 Notes
|
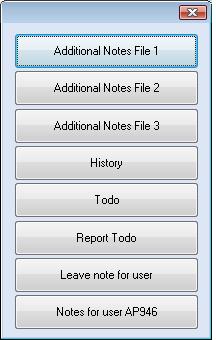
These files are kept in the client folder and are general purpose.
Each time you go in a new date and time stamped paragraph will be added.
Todo can be used to compile a todo list for client ZZZ.
Report Todo merges the individual todo lists to give a consolidated report across clients.
If you use the user management facilities outlined below, you can leave a note for a particular user. A user can pick up the notes left for them.
13.11.3 Standard letters
This button allows you to produce standard letters from a template and is covered in more detail in the section below.
13.11.4 Acquire from scanner
You can use this button to scan from a scanner. The scanned image will be stored in the client folder.
An entry will be made in the log.
13.12 Standard letters
13.12.1 Introduction
|
13.12.2 Selecting a template
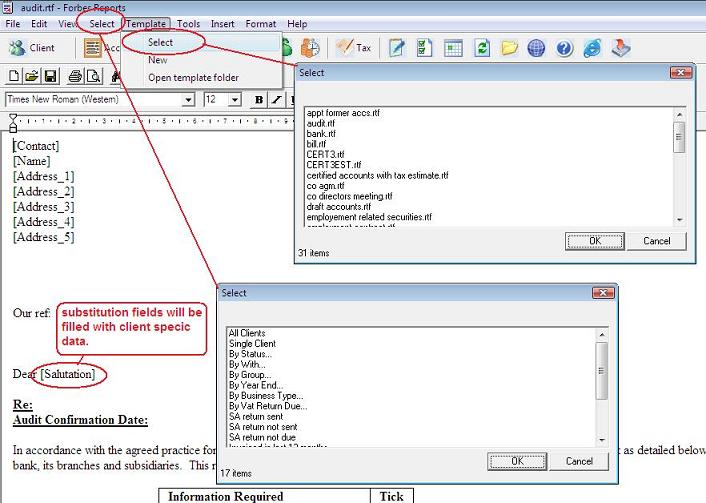
When you go into the standard letters program or when you press the template menu you will be prompted to choose a template.
Modifiy or creating your own templates ic covered below.
13.12.3 Merge fields
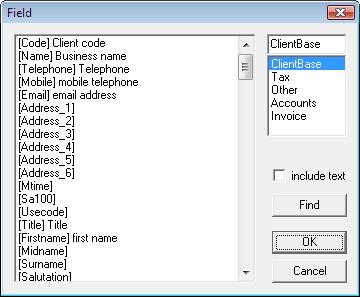
The template consists of text and merge fields for example [Salutation].
Merge fields can be inserted by typing or using Insert / Merge field
|
13.12.4 Pictures
Pictures and other objects can be added using Insert / Object.
13.12.5 Saving your template
Use File / Save or File / Save As to save your templates.
13.12.6 Selecting the clients
Use the select menu to choose the client or clients that you want to produce a letter using the selected template.
Copies of the letter will be stored in the client folder.
13.12.7 Advanced - Merge fields arithmetic
It is possible to perform arithmetic on merge fields.
For example tax liability is [TF\Boxes\CAL1] and first payment on account is [TF\Boxes\CAL11]. You might want to show the total of the two.
Dear [Salutation],
Your tax liability is [TF\Boxes\CAL1].
Payment on account [TF\Boxes\CAL11]
Total due in January is £[=dbval("TF\Boxes\CAL1")+dbval("TF\Boxes\CAL11")]
If the fields you want to add are XXX and YYY
£[=dbval("XXX")+dbval("YYY")]
This appears quite complex but you can just copy and paste from here.
13.12.8 Advanced - skipping
You can add fields to a standard letter that cause it to be skipped under certain circumstances. If you copy and paste into the standard letter (anywhere will do)
[=skip(not(dbval("TF\Boxes\CAL11")))]
Then if you run that standard letter for all clients, it will only actually get produced for ones with something in box CAL11 and similarly for other boxes.
13.12.9 Advanced - conditional text
The cond() function takes 3 parameters. The first is a condition. The second is the text that is returned if the condition is satisfied. The third is the text that is returned otherwise.
For example...
Your [=cond(dbval("TF\Boxes\CAL1")>10000,"large","medium")] tax liability is [TF\Boxes\CAL1].
displays
Your large tax liability is £18,319.
or
Your medium tax liability is £2,000.
You could also use this facility for displaying text conditionally for clients in certain groups
[=cond(isyes("Group00"), "this text only appears for clients in group 0", "")]
[=cond(isyes("Group01"), "this text only appears for clients in group 1", "")]
[=cond(isyes("Group02"), "this text only appears for clients in group 2", "")]
You can also embed newline characters in a string. This done by entering the character string $nl
e.g. [=cond(1,"one$nltwo$nlthree","")]
comes out as
one
two
three
13.13 Log and Reports
13.13.1 Log
|
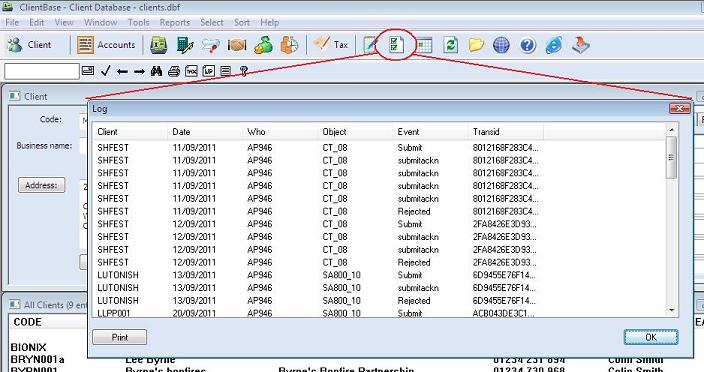
The log keeps track of documents scanned, created, submitted electronically etc.
A more detailed view for tax transmissions is avaialable in the log tab of the tax software.
13.13.2 Log
The reports menu allows you to run an existing report or create your own.
13.14 Communication
13.14.1 Sending SMS and Email
Using Tools / communication it is possible to send emails and SMS to clients.
To send SMS texts we use www.aql.com an email to text gateway. You will need to open an account and register your email address with them and purchase credits. Please chec that you can successfully send email via clientbase first.
13.14.2 Email Filing
ClientBase can take copies of emails you have sent and received via your email program and file them in the appropriate client subfolder based on the email address.
You can then browse these emails with clientbase and open then in your email program.
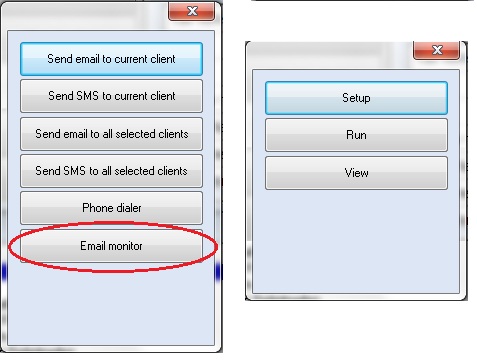
Choose Tools / Communication / Email monitor to take you into this part of the software.
|
First you need to use the setup button to configure the software to look at your emails. You may need to set up your mail server to keep archive copies of email messages. Once you have told the system which folders to look in, you can press the run button. The first time you use this, it may take a long time to scan all your emails.
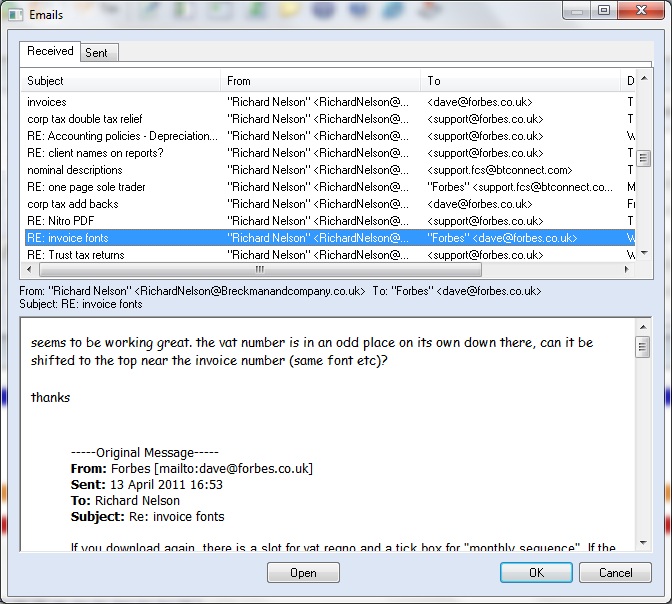
Copies of the emails for each client will be stored in the appropriate client folder in a subfolder called email. By first selecting the client in ClientBase, then choosing Tools / communication / email monitor / view you will see copies of the emails for that client. There are tabs at the top to select sent and received emails.
|
13.15 Calendars
13.15.1 Introduction
You can keep multiple calendars in the software, overall, per client, per user. These can be synchronised with calendars on other devices.
13.16 Customising
13.16.1 Adding fields
Before customising your client database it is strongly recommend you back up c:\forbes\clients\clients.dbf
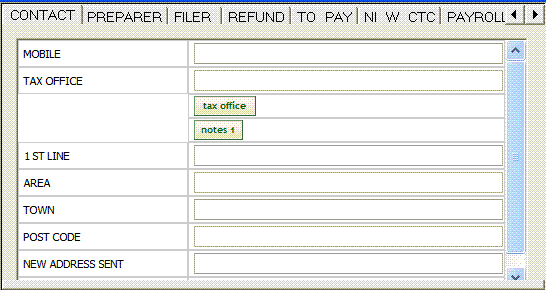
It is possible to put (several pages of) custom fields into clientbase. They will appear in the custom area to the left of the client window.
|
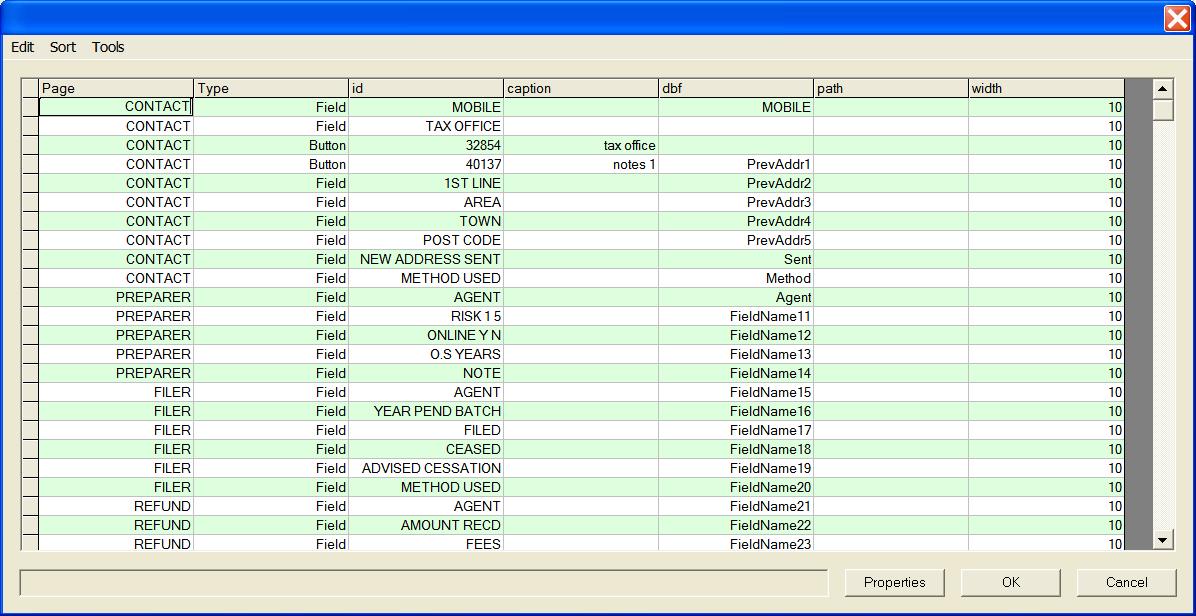
Choose Tools/Advanced/Customise/Edit custom field list
When prompted, choose the number of custom fields you want - say 5
|
Edit the field names etc. Compare the screen shot of entering the setup to the end result shown further up. Most of the entries are of type "Field". For buttons see the next section "adding buttons".
After completing the customisation exit from clientbase and come back in again
13.16.2 Adding custom buttons
As well as adding fields it is also possible to add short cut buttons. The above example on line 4 has the column Type set to Button. In the id field is the number 40137. The number 40137 corresponds to Tools / Advanced / Notes / 1. A list of available commands can be found at http://www.tax.co.uk/notes/manual/commands.txt
13.16.3 Multiple computers
If you are using this facility on multiple computers that are not networked you will need to copy the customisation file from one PC to another. If your customer code is nnnn the customisation file will c:\forbes\clients\nnnn.xml. Once you have customised one computer you will need to copy this to the other computers.
13.16.4 Quick commands
|
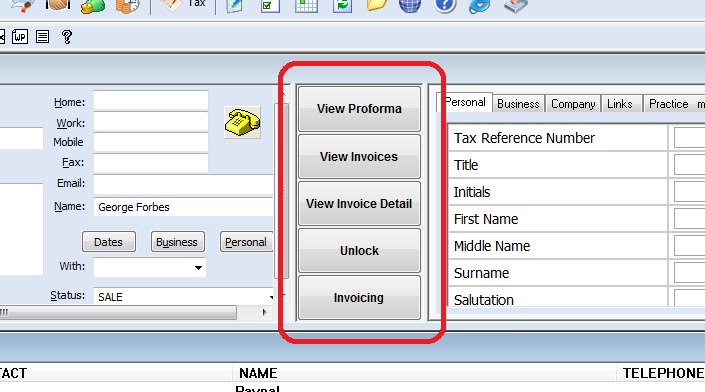
If there are menu commands that you use frequently and want to put on the front screen of ClientBase you can do this using Tools / Advanced / Customise / Quick Commands
13.17 User Management
13.17.1 Introduction
For larger multiuser set ups you may want to consider the user management facilities within the software.
You can enable this feature for some all or all the programs.
13.17.2 Enabling
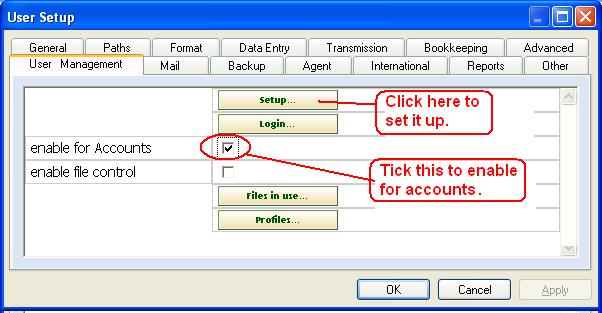
Go into the program in question, for example accounts and go to tools / user setup then user management. Tick the "enable for xxxx" box.
|
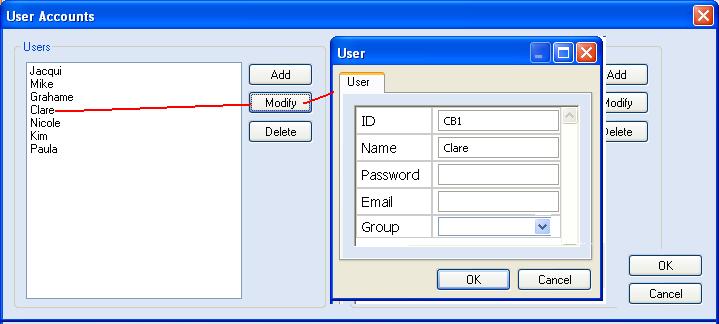
13.17.3 Users
|
13.17.4 User groups
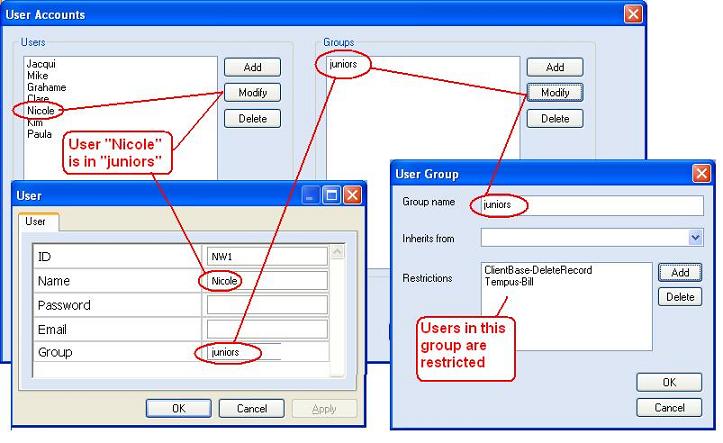
If you want to restrict certain functions with in the software to certain users you can set up groups, control the settings for the group and then assign the users to that group.
For example you could set up a group called "juniors" and prevent users in that group deleting records in the client database.
|
13.18 Secure Portal
13.18.1 Introduction
A portal is a website for sharing documents with your clients. You can put pdfs that are in the client subfolder, such as tax returns and paylsips onto the portal from within our software. The client can access these by logging securely onto the portal. This is convenient and complies with all aspects of data protection. Furthermore the client can approve such documents online.
As a resource the portal also contains copies of all accounts filed electronically at Companies House since November 2012, approximately 1.3 million at the time of writing.
We recommend you install the latest version of our software.
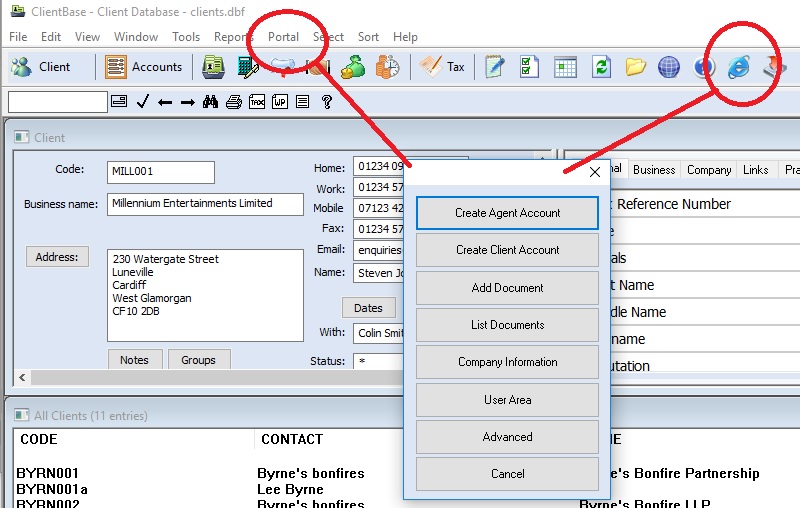
The portal menu is available within all out software by clicking on the web icon or the sync icon on the launchbar or by choosing the Portal menu in clientbase.
|
13.18.2 Company information
Use this option view accounts filed on the public record. You can search by company name of company number or by other criteria.
Using the other criteria option youe could look for all plumbers in a certain postcode area with more than a certain amount of cash at bank.
You would achieve this by adding criteria for the SIC code, postcode and CashBankInHand XBRL element.
After searching you can see the resulst as a csv in excel, as a web page (html) with links to the accounts or print labels or do a mail merge with the standard letters.
13.18.3 Create Agent Account
Use this option to create an account for your practice. You must set an email address under Tools / User setup / agent details before using this command. You will be asked for a password. You only need to do this once.
13.18.4 Create Client Account
Before you upload for the first time you must create an account for the client. It will use the email address in the client database and prompt you for a password. You must inform the client of the password and email address that they will use to log on. See point 6 below.
13.18.5 Add Document
This will allow you to select a pdf from within the client folder (or payslips subfolder) and upload it to the client portal.
The document must be in PDF format and in the client subfolder
There are specific short cuts in some of the packages:-
13.18.6 List Documents
This lists the documents and the status (e.g. viewed, agreed) of the documents for this client.
13.18.7 Client Access
The client can access their documents by logging onto http://www.securefiler.co.uk using their email address and password as created in point 3 above.
13.18.8 Company information
This contains 1.6 million sets of accounts and a searchable database.
13.18.9 Advanced
In the advanced menu you will find:-
13.19 Cloudsync
13.19.1 Introduction
You can store data in the cloud to be accessed over the internet and keep multiple remote machines synchronised
13.19.2 Initial setup

|
13.19.3 Automating the synchronisation