17.1 Introduction
CISassist is a CIS management suite designed to be very easy to use.
It is intended for use by both bureau services and in house. It consists of three modules :-
17.1.1 Features of the package
17.2 Getting Started

17.2.1 Starting the CISassist program
Go into the Start menu and choose Forbes Systems the CIS then CISassist.
Alternatively, if using Forbes ClientBase, select the Contractor in the database and choose CISassist from the Tools menu.
17.2.1 Starting the CISassist program

Across the top of the CISassist screen are are number of tabs.
This selects which part of the program you are using.
Generally you will start on the left hand side and work your way across towards the right.
If you would like to see some sample data, choose File then Open and open the file “demo”.
17.2.2 Wizard

If you are new to using CISassist you may want to click on the wizard button on the tool bar.
The wizard will guide you through completing the necessary information.
17.2.3 Contractor Details
Select the “Contactor” tab or choose “Contractor Details” from the Contractor menu to set up the contractor details.

17.2.4 Adding Subcontractors.
Select the “Subcontractors” tab.
Click on the Add button. Fill in the Subcontractor’s details.
17.2.5 Subcontractor details.
Click on the Add button in the Subcontractor group. Fill in the Subcontractor’s details.

further details can be completed by pressing the details button
17.2.5 HMRC CD
If you have more than 125 subcontractors the HMRC will supply you with a CD listing all their names and UTRS.
You can import this data into CISassist by placing your HMRC CD in your cdrom drive and then choosing File / Import HMRC data from with CISassist.
17.2.6 Changing year.
Go to Tools then User Setup.
17.2.7 Saving your CISassist data.
Choose Save from the File menu. Forbes CISassist suggests a filename. You should override this if it is different from you client code.
17.2.8 Opening an existing CISassist data file.
Choose Open from the File menu. Select the CISassist you have previously saved.
17.3 Status check
Click on the Status tab to link to the online employment status checker that is included with your product.
17.4 Entering Payments
17.4.1 Introduction
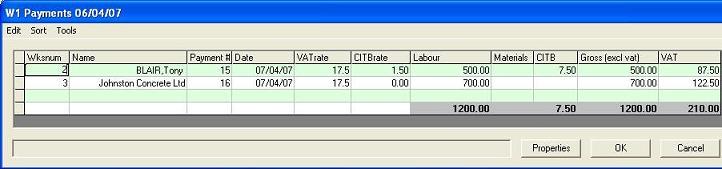
The payments window is to the left of the CISassist screen.
Above it is a tabbed control to allow you to select all payments or the payments for a particular subcontractor.
The “All Payments” tab is what you use for data entry.
The “selected subcontractor” tab is useful for seeing the payments allocated to a particular tax month for a particular subcontractor.
17.4.2 Entering payments
Select the “all payments” tab.
There will be an entry called “recurring payments”.
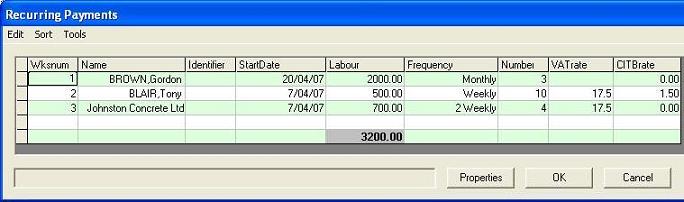
You can click on this to enter recurring payments – for instance if a particular subcontractor is going to be paid £500 per week for 5 weeks you could enter this under recurring payments.
Once you have the recurring payments section completed you can add payments for a particular week by pressing the “Add” button.
This will add a new week (starting with week 1).
This will be pre-filled with any suitable entries from the recurring payment section.
You may at this stage modify the amount for materials and add any other subcontractor payments.
When you press OK, the software will go through the schedule and allocate the payments to the individual subcontractors records.
17.4.2 Custom Fields
By choosing Tools then User Setup then customize you can add custom fields to the data entry screens.
17.5 Reports
17.5.1 Reports
To print a report click on the report tab or select the report menu.
You will be prompted to choose a report such as payments or invoices.

For most reports you can filter the report based on subcontractor, date etc..
17.5 Pay and Deductions Statements
17.5.1 Printing Payment and Deductions advice
Click on the reports tab and choose “pay and deductions statements”.
Select the subcontractors that you are interested in.
Choose File then Print.

17.5.2 Emailing Payment and Deductions advice
First ensure that the email addresses have been entered for each subcontractor, using the “other” button under subcontractor details.
Also ensure that the settings under Tools / User Setup / Mail are correct for your email system.
Bring up the pay and deductions statements as above and then choose File / Send email / Pay and deductions statement To subcontractors.
Emails will be sent to each subcontractor.
It is also possible, if you are acting on behalf of the contractor, to send any report to the contractor.
Set up the contractor email address under contractor details.
Bring up the report on screen and choose File / Send Email / Report to contractor.
17.6 Payment reminders
To set payment reminders use the payment reminders submenu under tools.
This will reminders in the Forbes Year Planner.
Once you are in the Forbes Year Planner, you can enter up to three email addresses under Tools/User Setup.
If you use a non-standard email program this may also be configured under user setup.
To test your email is configured correctly, choose Tools / Test email.
If you use Outlook as your diary/scheduler, when the Forbes Year Planner is on screen select update outlook from the File menu. If you use a different diary/scheduler you may export the reminders in .vcs format by choosing File / Export VCS.
17.7 GovEx – exchanging data with the HMRC electronically
17.7.1 Introduction
Management of CIS verification is handled online via GovEx.
Before you can use the service you must register at http://www.gateway.gov.uk. When you register you will be given a userid and password
17.7.2 Terminology
This section defines some of the terms used with respect to internet filing. Knowing these terms will be useful if you ever need to discuss electronically filed data with the HMRC.
IRmark
The irmark or unique return identifier is a sequence of numbers that is printed across the top of the return and transmitted to the HMRC as part of the xml transmission.
It is a “watermark” to prevent tampering. Make any change to the return and the irmark will change, change the data back to what it was and the irmark will also revert.
No changes should therefore be made to the return after it has been signed by the client.
Correlation ID
Each time you transmit a return the gateway computer generates a Correlation ID.
It is like a booking reference that uniquely identifies that particular transmission.
Quote the correlation ID to the HMRC help desk and they should be able to identify the transmission.
It will appear on all acknowledgements and responses.
If you stop a transmission (see below), make sure you save the return.
Keys
The key data is the data on the return that uniquely identify it. For CIS transmissions the tax office number and paye ref of the contractor.
Any error message referring to “keys” indicate an error in these.
Acknowledgement
This refers to a message received from the HMRC’s computer to indicate that the return has been received but not yet processed.
Response
This refers to a message received from the HMRC’s computer to indicate that the return has either succeeded or failed.
17.7.3 Preparing the data
Complete all the relevant information in CISassist.
Click on the verify tab to send a verification request. Click on the monthly tab to send the monthly return.
This will launch GovEx.
match
17.7.3 Match or Verify
MATCH will check the HMRC computer records for a matching subcontractor. If no details exist, then it will return as unmatched but no verification number will be issued. This is useful for checking that you have correctly entered the subcontractor details.
VERIFY will check the HMRC for a matching subcontractor. If no matching details exist a new record and verification number will be produced. Please note – the lack of matching record could be caused by something as simple as a different spelling of a name. We would normally recommend using MATCH first. Further guidance is available under the help tab.
17.7.4 Submitting the data

You submit a return by loading the return, going into the Transmit tab. This will happen automatically when GovEx is launched from CISassist.
If there are no errors you will be prompted to transmit.
If there are errors reported and you feel that they are not significant you may still submit by pressing the submit button.
The following screen appears asking for your logon details.

Enter the userid and password supplied by the HMRC. ( You must already have registered at www.gateway.gov.uk ).
On pressing OK, you should be connected to the internet. If this does not happen, make sure you have a working internet connection and try again.
When you submit a return, one of three things can happen. You can get an response of success, a response of failure, or most likely of all, just an acknowledgement.
An acknowledgement means that the return has been received but not yet processed. ProTax will automatically query the HMRC’s computer, resulting in a sequence of acknowledgements followed by either success or failure.
The whole process should take less than 30 seconds.
If you see nothing at all there check
your internet connection is working (you may need to connect to the internet manually)
you do not have a software firewall such as Norton, McAfee or zone alarm preventing the response arriving
The following picture shows the screen that appears while ProTax is waiting for a response.
ProTax has asked 4 times for a response, but in each case it has received just an acknowledgement.
In due course, and typical within 30 seconds ProTax will receive a response.

At busy times, it may take longer than 30 seconds to get a response.
Instead of waiting for a response now, you can use the stop button.
Save the return and carry on with other work and possibly other returns.
It is important that you save the return as it needs to store the correlation id.
A new correlation id is generated every time you transmit a return and will be displayed in all responses and acknowledgements.
ProTax will also transmit this number to the HMRC’s system when asking for responses. It is a bit like an airline booking reference.
Later on, you may reload the clients return into ProTax, go to the FBI tab.
If a correlation ID has been stored you will be asked if you wish to continue waiting for the response.
17.7.5 Sample Acknowledgement

Above is a sample of an acknowledgement message. This indicates the return has been received but NOT YET PROCESSED. The correlation ID uniquely identifies this transaction. Later on there is a timestamp.
This message indicates the IR have received your return but not yet processed it. You will probably get several such acknowledgements.
17.7.6 Sample Acceptance

Above is a sample acceptance message. The correlation ID uniquely identifies this transaction. Later on there is a timestamp. Print a copy of this message for your records.
17.7.7 Sample Rejection
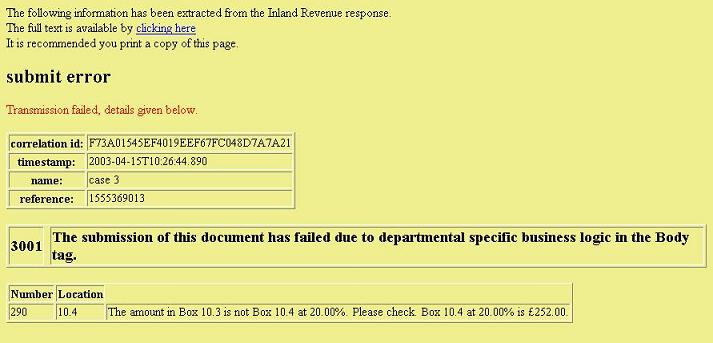
Above is a sample rejection message.
This indicate failure. The correlation ID uniquely identifies this transaction. Later on there is a timestamp.
If you scroll down using the scrollbar on the right you will see the rest of the rejection message. The example below indicates that the figure in 10.4 is incorrect.
17.7.8 Schema Validation
The XML data that is transmitted to the HMRC is checked by their system against something called a schema.
This checks the integrity of the data and produces (often incomprehensible) error 6010: schema validation errors.
The data is checked against the schema before transmission to give a more understandable error message.
17.8 Year end procedures
17.8.1 Year end procedures
CISassist supports multiple active years. There is no specific year end procedure that you need to perform unless you have performance issues.
If you have performance issues see the next section on how to remove old data from the system.
You can select which year is active in CISassist by going into Tools / User Setup and then choosing Year. You can do this at any point.
During April and early May, a period when you are likely to be working on two separate tax years, each time you go into CISassist it will ask you which tax year you are going to work with during that session.
17.8.2 Removing 2007 data
If your machine is running slowly you may want to reduce the amount of data that is active by removing your 2007 data.
It is not recommended that you do this until you have successfully filed your last monthly return for the previous year.
First make a copy of your 2007 data file by choosing File / then Save As. It is recommended that you make a backup copy of this data file.
Exit from the software and come back in, open your original data file and remove the 2007 data by choosing Payments / delete 2007 data.
17.9 Using external data tables
17.9.1 Introduction to external data tables
By default CISassist stores all the data in a single file. This includes contractor details, subcontractor details and payment details.
This is convenient as all the data is stroed in one place. However when there are a large number of subcontractors or payments, or when you want several staff operating at the same time, there may be perfromance issues.
It is possible to split the data file into 3 parts: the contractor data, the subcontractor data and the payment data.
Performing this operation also allows you to open the payment or subcontractor databases in other programs such as Excel.
17.9.2 Splitting the data
Make a copy of your data file – e.g. mydata.pay.
Choose tools/advanced external data source / create
If your original file was called mydata.pay, you will now have 3 files mydata.pay, mydata_emp.dbf and mydata_pay.dbf containing the contractor data, subcontractor data and payment data respectively.
It is important that all 3 files are kept in the same location.
17.10 Filing history
If you go into the contractor tab you will see a client code, possibly defaulted to 001
If the client code is 001, all the data will be logged in the folder c:forbesclients�01 (assuming the software is installed in the default c:forbes).

Copies of every transmission and every response are kept.
The ones starting CISrequest are verification transmissions and the ones starting CISreturn are monthly returns. The numbers after this are the date and time e.g. 080403_123337 means 3rd April 2008 at 12:33 and 37 seconds. The final two digits refer to the version of the software – 07 or 08 used for the transmission. These files are in the forbes format (with the .tax suffix) and maybe opened in the forbes GovEx software by double clicking on them. The ones with the .xml suffix are the underlying raw data that is transmitted and received from the HMRC computer. They may be opened in internet explorer by double clicking on them. The format is xml and maybe a little unnerving to non IT people. The ones beginning IR-CIS-CIS300MR are monthly returns and the IR-CIS-VERIFY ones are verification requests. The date format is as above. Copies are kept of the transmission and the response from the HMRC. The responses will have “response_rejected” or “response_accepted” in the name. Examples of this can be seen towards the bottom of the list.