16.1 Introduction
16.2 Getting Started
16.2.1 Starting the Control Centre program
From the Windows Start button, select Programs, Forbes Systems and then Control Centre.
16.2.2 The Control Centre Window
The screen shot below shows the main Control Centre window.
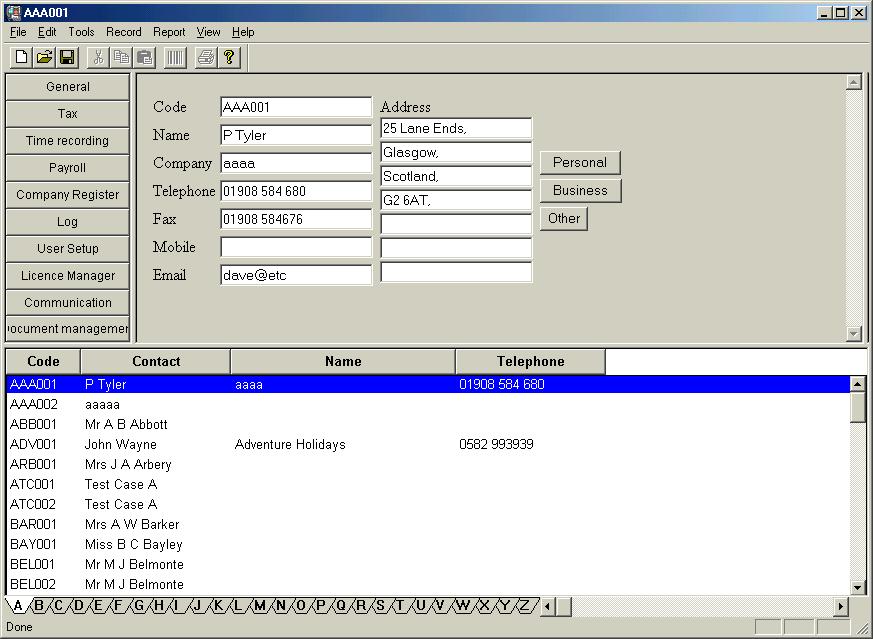
The screen is divided into three main areas.
The bottom half of the screen is the client list.
This lists all the clients in the database,
The top half is divided into the command window on the left and the detail window on the right.
The command window allows you to issue commands, such as loading the clients tax returns,
The detail window displays further detail for the currently selected client,
16.3 The Client List
16.3.1 Adding and Deleting Clients
The Control Centre picks up the list from Clientbase. To add and delete clients use the Clientbase (select from the Forbes Systems group as above). For a full description of the functions of Clientbase, refer to Chapter 13 of this manual.
16.3.2 Editing the existing client list
You can update the details for an existing client from within Control Center. Select the Client in the lower half of the display.
The Clients details will be shown on the top right section of the display.
16.3.3 Changing Clients
The top right of the screen displays the details of the current client.
The current client will also be highlighted in the list in the bottom half of the display and on the windows title bar at the top of the screen.
To select a different client, click on the person you require in the list on the bottom half of the display.
To jump to an alphabetic section in your client list use the initial alphabetic search tabs at the bottom of the display.
Alternatively, you can use the Record then Find.
16.3.4 Sorting the client list
Choose view then sort
16.4 The detail window
The detail window gives further details of the selected client.
The fields can be edited and will automatically update the database.
There are buttons down the right hand side to bring up personal details, business details and other details.
Fields can be added to the screen brought up by the “other” button,
It is also possible to completely customise the detail windows.
Please contact Forbes for further information and pricing.
16.5 Using the Command window
Control Centre allows you to access your programs using the Navigation Buttons on the left side of the top half of the screen.
These commands are also available in the Tools menu.
16.6 General
16.6.1 Scan
16.6.2 Notes
To create a file note for a client, first select the client in the list. Then click on the general button and select notes. You will be taken into a notepad file. Type in your notes anywhere on the notepad file, and select file, save upon completion.
16.6.3 To Do
This follows the same principles as Client Notes, and is also accessed from the General button.
16.7 Tax Returns
To create or access a client’s tax return, select the client in the client list. Then click on the tax return button and select the appropriate tax package. You will then be taken to a tax return for the client. The tax return will automatically be added into the log.
16.8 Time Recording
This button takes you to the Tempus package, covered elsewhere in this manual. To access the current timesheet, use the record option. The other options, such as WIP, take you directly to those parts of Tempus.
16.9 Payroll
This button will take you directly to the Payroll for the highlighted client. For a full description of the payroll package refer to the relevant part of this manual.
16.10 Company Register
This button will take you directly to our company secretarial. For a full description of the payroll package refer to the relevant part of this manual.
16.11 Log
16.11.1 Introduction
The Log is the key element in document control. It allows you to monitor all your documents, whether they are spreadsheets, incoming letters, outgoing letters, tax returns, payroll files etc. As soon as you create a document, as explained earlier in this chapter, it is added automatically to the log. When you click on the log button, or use Tools, Log, you can choose whether to view the log for all your clients, or for just the current client.
16.11.2 Adding New Items to the Log
To add new items use the Navigation buttons on the left side in the top half of the screen, as explained earlier in this chapter.
16.11.3 Working on Existing Items in the Log
If you wish to work on item of work already started, then you should select the client form the client list, then view the log for this client. Look in the Log for the item of work you wish to access. Then click on it once to highlight the item, and then click on the view button at the bottom of the screen. Alternatively, just double click on the item in the log that you want to access. You will then be taken straight to the item of work. Carry out any changes on the piece of work and save upon completion.
16.11.4 Completing an item of work
When you have finished an item of you can tick it off your log. To do this you highlight the appropriate item of work in the Log. Then click on the Completed button and a tick appears next to the item. The line changes from red to black to further emphasize the status of the item of work. If you inadvertently tick off the wrong item of work, highlight the item of work, click on the Details button, and delete the tick from the Complete box.
16.11.5 Changing the Log Details
If you need to amend or add details to appear on the log, such as due date, select the item of work you wish to edit. Then click on the Details button at the bottom of the window. The various fields that appear in the Log for that item are then displayed in a form.
Edit the boxes that you wish to change, and click OK. The Log is then updated to show new details for that item of work.
16.12 User Setup
16.13 License Manager
You can access the license manager program through the general button. This allows you to unlock the demo versions of any Forbes products you have purchased. In license manager, you enter your software unlock code shown on your invoice by clicking on the unlock button. The list shows the Forbes products for which you have licenses.
16.14 Communication
16.14.1 Email
Use this command to send an email to the currently selected client (requires MAPI compliant email program such as Outlook)
16.14.2 Phone Dialer
Use this command dial the telephone of the currently selected client (requires TAPI compliant modem)
16.15 Document Management
16.16 Reports
A variety of reports are available by selecting the Reports menu.
Client List report is a list of clients names and phone numbers.
A more detailed report can be selected by choosing “this client” or “all clients”.
It is also possible to produce customised reports.
Please contact Forbes for further information and pricing.
16.17 Adding fields
Click on Edit then Advanced then Edit database format.
Any fields you add will appear under the other button in the detail window.