15.1 Introduction
15.1.1 General
Tempus is made up of two components
ClientBase: A database of client information for keeping track of your clients names and addresses.
Tempus: The time-recording and billing system. Produces weekly timesheets on screen and in hard copy. Keep track of work in progress, amount billed or written off and raise invoices.
15.1.2 Installation
Refer to section 1 of this manual for installation procedures.
15.1.3 Starting Tempus
mouse: double click with the mouse
keyboard: use the arrow keys to highlight the icon, then press ENTER
It is recommended that you start Tempus now, and refer to the computer screen as you read through the manual. You are encouraged to experiment with the software as you go. When you have finished experimenting and wish to start with real data, please read the chapter 9, starting with real data.
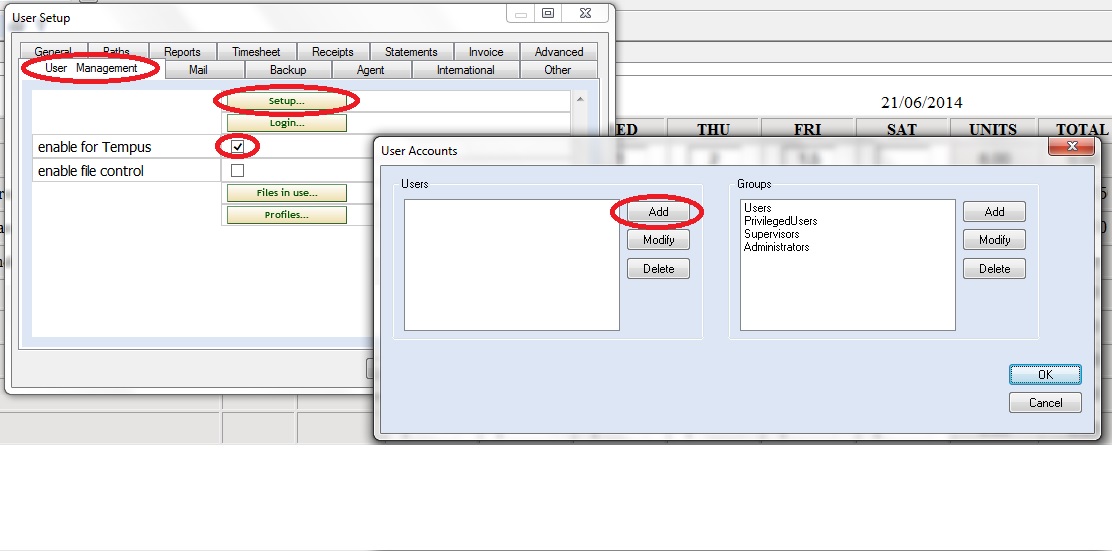
15.1.Setting up users
Choose Tools / user setup / user management
Often you will want to tick “always login” under tools / user setup / advanced.

If you have already set up users on a standalone machine move um.cxml to the server shared directory
15.1.Setting up tasks and rates
Choose Tools / User setup / General / Tasks and Rates

You can use the Add,Delete and Modify buttons to edit the tasks and rates.
The task/rate dialog has entry fields for code and description. It also two fields for rate. The first is for the standard rate for this task. The second is to set the rate specifically for the current user. You can change user by exiting from the software and returning or using the login menu.
15.1.4 Logging in.
When you start Tempus for the first time on a machine you will be asked to enter your name. Your initials will be entered automatically. It is these initials you will see on reports etc.
15.2 The Display
15.2.1 The Tempus Window

In Windows terminology the Tempus display on the computer screen is referred to as the Tempus window.
In the following description, terms in italics refer to the above picture of the Tempus window.
The work area is the main part of the Tempus window, where the timesheet you are filling in will be displayed. The screen is not big enough to show the whole form, just the part you are currently working on. In the next chapter you will find out how to move around the form.
Towards the top of the window is the menu bar. The commands you use with Tempus appear in the menu bar.
The menu bar contains menu commands:-
15.2.2 Using commands
You use commands in the menu bar to work with the form. To select a menu e.g. File click on it using the mouse or if you prefer to use the keyboard hold down the Alt key and the underlined letter e.g. Alt+F for the File menu.
When you do this, a pulldown menu appears. For instance, to save a file, choose the File menu, then from the pulldown menu that appears, choose Save As. This is shown in the picture below. You may select the menu item with the mouse or using the up and down arrow keys.
In the rest of the manual this will be referred to as selecting Save As… from the File menu, and similarly for other commands in other menus.
Commands in the pulldown menu may have a letter underlined, for example the O of Open.
To select these items once the pulldown is displayed just press the corresponding keyboard key.
Other commands are followed by a keyboard accelerator. For example Open… in the File menu is followed by the accelerator Ctrl+N. You can use the accelerator to perform the command from the keyboard without going through the menu system. When editing a form, pressing, the Ctrl and the O keys at the same time for example will perform the Open… command.
15.3 Time recording
15.3.1 Filling in a timesheet
It is entirely up to you what you choose the units on the timesheet to represent. You can interpret 2 to mean two hours or two 6 minute units. All rates enter are per unit rates. So if you are treating units as 6 minutes and an hourly rate of £50, which corresponds to £5 per unit, enter 5 as the rate.
The first thing to do on each row of the timesheet is to select a client. Double click with the mouse on one of the empty cells in the Client column. This brings up a dialog allowing you to select a client, a task and a rate. You can also enter a full description. The clients are picked up from the client database. There are some sample clients in there. We will come back to the client database in a later chapter.
If you are using the ProTax combination suite of tax software the client database is common to both Tempus and ProTax.
As you fill in time, the total in units and currency are displayed in the total columns on the right of the time sheet. You can select the week for the timesheet by either typing in a date or using the << or >> buttons, which change the date to the previous (next) week. You can fill in the time sheet interactively during the week. As you exit, say yes to “save changes ?”. When you return to Tempus your timesheet will reappear.
To work on a new time sheet, choose New from the File menu. Use Open from the File menu to look at the timesheets for other weeks that you have prepared.
15.3.2 Posting a completed timesheet
At the end of the week, when a timesheet is complete, you should post it to the time recording database. Do this by choosing Post Timesheet from the Tools menu.
15.4 Printing
15.4.1 Printing a time-sheet
To print your timesheet you are currently working on, select Print from the File menu.
OR: on the keyboard press Ctrl+P.
The following dialog box will then appear:-

Selecting OK will print the time-sheet.
15.5 Storing your work and File Management
15.5.1 Saving the time-sheet
Saving the form is one of the most important activities you perform. This copies the data you have entered from computer memory to a file on disk. If you do not save the form the data will be lost when you exit from Tempus. If you are working on a form for a long time it is advisable to save your work at regular intervals. This way, if there is a power failure or other accident, you do not lose all the work you have done.
To save the time-sheet you have filled in choose Save As from the File menu.
Use File Save to save the current form without changing the name.
15.5.2 Automatic saving
When you exit from Tempus you will be asked if you want the data saved automatically. Next time you start Tempus the time-sheet you were previously working on will be loaded.
15.5.3 Opening a recently used time-sheet
A list of the five most recently used files is listed at the bottom of the file menu. To open one of these select the File menu. Using the mouse or cursor keys, select the file you wish to open.
Alternatively, if using the keyboard, enter the number to the left of the files that you wish to load.
If you are currently working on a time-sheet and have made changes, you will be asked if you wish to save the changes you have made before loading this new form. Selecting Yes will save the changes you have made to the current form. No will abandon the changes. Cancel will abandon the open command, allowing you to take whatever action you wish. You then may reselect the Open command.
15.5.4 Opening a time sheet
To retrieve a time sheet you have previously saved to disk using File Save or File Save As select Open from the File menu. Alternatively press Ctrl+O on they keyboard.
Select the file you wish to open using the mouse or keyboard TAB and arrow keys. If there are more files than will fit in the list you can use the scroll bar or arrow keys to display files that are not visible. Typing the first letter of the file you want will take you to the appropriate part of the list. You can then use the arrow keys. Alternatively type a file name into the file name box.
Once the file you want is in the file name box, select OK.
15.6 When you have finished
When you have finished working with Tempus, select Exit from the File menu.
If you have not saved the time sheet you are working on the following dialog will
appear :-

Select Yes to save the file.
Select No to abandon the changes you have made in the current working session.
Select Cancel to cancel the Exit command, and continue working with Tempus. Select Cancel if you have selected Exit by mistake.
See Storing your work for more information about saving.
15.7 Reports
15.7.1 General
At the end of the week, when a timesheet is complete, you can post it to the time recording database. Do this by choosing Post Timesheet from the Tools menu.
You can produce reports from the database.
To produce a complete report of all time recorded choose Time recorded from the Reports menu.
You will be presented with the Select dialog :-

This allows you to make the report more specialised. Just choose OK for now. This produces a report of all time recorded.
Printing the report
You can print this by choosing Print from the File menu.
To exit from the report and return to the main Tempus window choose Exit from the File menu of the report window.
Restricting the report
To restrict the report to just time recorded against a single client, choose Time recorded from the Reports menu. Then in the Select Dialog, just select the client of choice.
Similarily you can select jtime recorded by a particular fee earner in the select dialog. If you do both, a report of time recorded for a particular client by a particular partner is produced.
Within the select dialog you can also specify the category of work using task:, and the dates that the time was recorded (from: and to:). Using this facility you could report on all time recorded in the tax category between March 5th and April 23rd (possibly by a particular fee earner etc.).
15.7.2 Other reports
In addition to the report of Time recorded there are also a reports of :-
WIP (work in progress)
Time billed
Time Written off
Invoices raised
You can experiment with these after you have billed some time in the Billing chapter. All reports work in a similar way, so that you could produce for example a report of time written off by a particular member of staff between certain dates.
15.7.3 Billing
To bill time to a particular client choose Bill from the Tools menu. You will then be asked which client you wish to bill.
On pressing OK you will be presented with the Billing dialog. This consists of the WIP list and some amount fields. The WIP list displays the WIP for the chosen client. You can select one or more lines from the WIP list using the mouse. The amount field displays the total cash amount for the Wip entries selected. To bill a partial amount from a WIP entry just manually reduce the amount field. For example if you selected a WIP entry for £300 pounds, the amount field would be set to £300. Leaving it at this default will remove the WIP entry completely. Editing the £300 and changing it to £200 will cause the WIP entry of remain in the database with value of £100 (£300 less £200 being billed).
It is also possible to incorporate super-profit (loss) by entering a positive (negative) figure in the recovery box.
When you are happy with the WIP entries selected, select either Bill to raise an invoice or Write off.
Choosing either will remove the WIP entries from the database. Choosing Bill will generate a draft invoice which will be added to the invoices database
The list of WIP presenting in the billing dialog can be restricted to a particular task or fee earner. You would do this in the Select Dialog as described in the reporting chapter.
Once you have created a few time sheets and raised a few invoices you can produce reports of work in progress, time billed, time recorded etc.and invoice reports using the various choices in the Report menu.
15.7.4 Pre billing
It is possible to pre-bill a client before any time has been recorded. Do this by choosing Bill from the Tools menu.
Do not select any WIP from the WIP list. Just enter an amount into the amount: box. An invoice will be raised for this amount and and negative WIP entry added to the database.
Allocating time recorded against pre-billing
It is possible to allocate time-recorded at a later date to this pre-billed amount by choosing Bill from the Tools menu. Select in the WIP list both the negative pre billed WIP and the WIP to allocate against it. Then choose Bill. The time recorded will be removed from database and the pre-billing negative WIP reduced.
15.7.5 Super profit
It is possible to add superprofit to an invoice by filling in an amount in the recovery: box. This will add this amount to the fee note/draft invoice., but will not affect the time recording database (i.e. WIP) for that client. A super loss can be specified by entering a negative amount in the recovery box. These super profits/losses will appear in the invoice report, produced by choosing Invoices from the Reports menu.
15.8 ClientBase
15.8.1 Starting Clientbase
15.8.2 Running Clientbase
Refer to the section 13 of the manual.
15.9 Starting for real
Setting up your categories and rates
Choose User setup from the Tools menu.
Press the Rates… button and this dialog will appear :-
To modify the rate for an existing category of work, select the category in the list box. Type in the new rate in the standard box. To set a different rate for the fee earner logged in enter this in the right hand box. Once you are happy click on the Modify button.
To add new categories type in the Title and Code boxes. The code should 5 characters or less. Fill in the rate then press the Add button
Clearing out the test data
Once you are have finished experimenting, you will want to clear out the time recorded from the database. Do this by choosing Clear databases from the File menu.
You may also want to delete any time sheets you have produced. Do this using File manager in the main group of windows. Choose Search from the File menu.
In the dialog shown above type *.ts in the box labelled search for. In the start from box type C:forbes empus,
(or the appropriate drive letter if installed on a network).
After pressing OK, highlight all the resulting files in the search window and choose Delete… from the File menu.
Backing up
It is recommended that you back up the time recording and invoice databases regularly. These are time.dbf and invoices.dbf in the forbes empus directory.
You may also want to back up individual time sheets. Do this as above using File manager, but choose Copy from the File menu ( rather than Delete… !!! ).
We would recommend running Tempus in parallel with your existing system until you are entirely happy. If you have any problems do not hesitate to telephone.
15.10 Editing the ledger directly
15.10.1 Introduction
When you post timesheets, bill and write off time and record cash receipts this is updating the ledgers stored with in Tempus.
In exceptional circumstances you may want to edit these ledgers directly. This can be done by two main methods.
The latter method is not suitable for large ledgers as they may be beyond the capacity of your spreadsheet program. Alsways back up before doing this.
15.10.2 Using the ledger editor
In the Tools / Advanced menu you will see a number of choices for editing ledgers.
Selecting one of these will bring up the following screen ….

The first field is the record number, or line number within the ledger.
You may enter a number here and it will take you to that record e.g. 1000.
Below the entry field is a scroll bar that allows you to scroll through the records.
The remainder of the screen shows the content of the record.
If you make changes the Update button as shown on the screenshot appears.
It is only when you press this button the actual record is updated.
Please note that the format of dates is YYYYMMDD.
15.10.3 Using a spreadsheet
In you spreadsheet program choose File then Open. Change the input filter to open dbase databases.
Select one of the following files to open. They will all be located in the c:forbes empus folder by default, but maybe elsewhere if your installation is on a network.
Make the changes you wish then choose File / Save. It is NOT RECOMMENDED that you delete rows in this manner.
Please note that the format of dates is YYYYMMDD.
15.11 Project based time recording
Tempus supports project based billing where you do not bill to a client directly but to a project or job, with several jobs allocated to a client.
Record time, bill etc against jobs in exactly the same way as you would against clients in the standard non-project based usage.
To amend the project database chhose Tools / View Jobs. However remember that if you have already recorded time against a particalur job code.